Version Control with GitHub
Description:
We want to keep track of our work in a place that we can also share it with our collaborators, and eventually with the public.
GitHub is a version control system which tracks changes to code and shares it across teams. While it is predominantly used by software engineers, it is increasingly used by researchers in open science, for the same reasons.
Create a new Repository
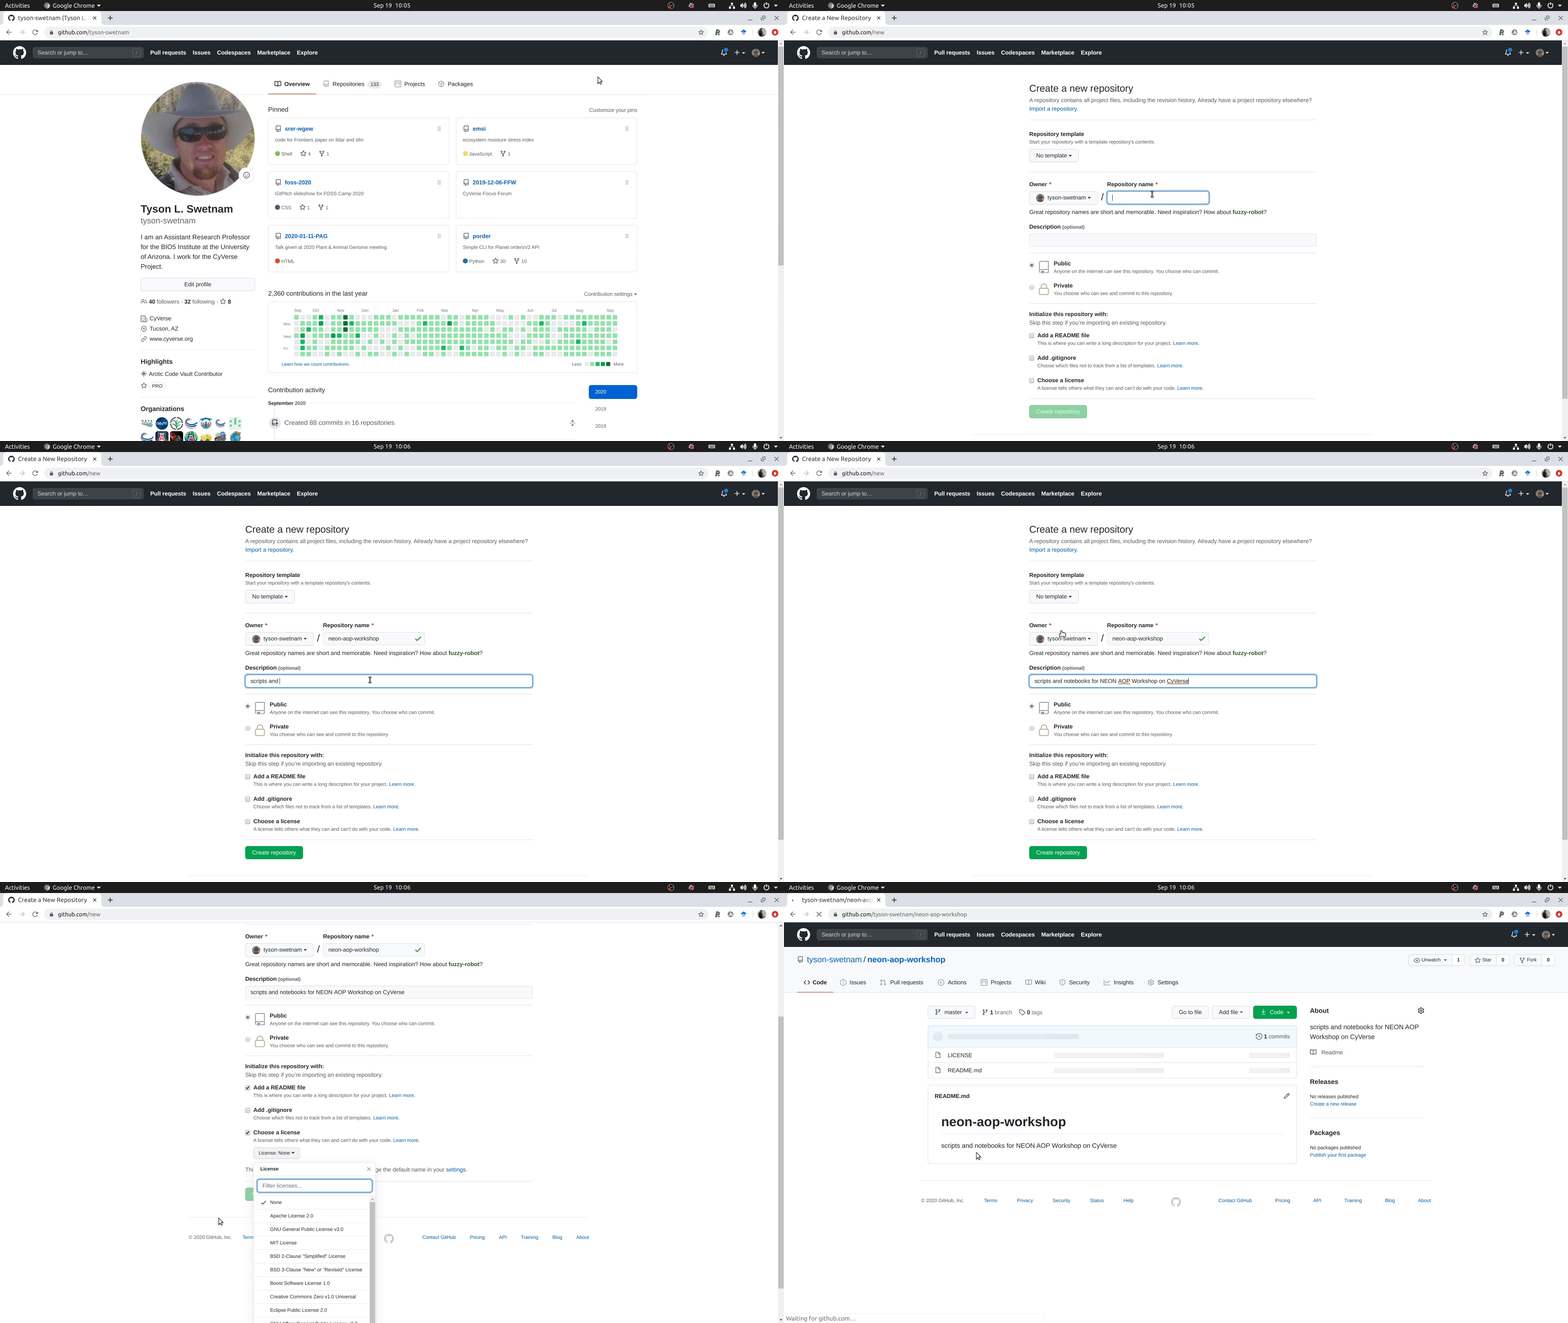
1. Log into GitHub with your GitHub username
2. click on the + icon in the upper right of the screen.
Select ‘New Repository’
3. Give the new repository a name, e.g. neon-aop-workshop
If you have an existing repo with this name it will be disallowed.
4. Allow the repository to be “Public” – if you want, you can make it “Private”, and it will add the requirement that you authenticate to GitHub everytime you want to clone the repository somewhere else.
5. Select the option to create a README.md file with the repository. This will create a blank markdown file that you can populate with text later.
6. (Optional) Select a License for your code
Choosing a license is important to ensuring that your work is properly attributed and cited in the future.
Choosing a License
choosealicense.com offers support and answers questions about selecting the right license.
7. You’re ready to go back to your CyVerse RStudio browser tab.
Clone your Repository into RStudio Server running in CyVerse
RStudio can create a R Project using Version Control with git or svn (another version control platform).
Creating a R project with Version Control will allow you to sync changes back up to GitHub while you’re working and when you’re finished.
git also allows you to pull other GitHub repositories and work with existing code and analysis notebooks, thus enabling repeatability.
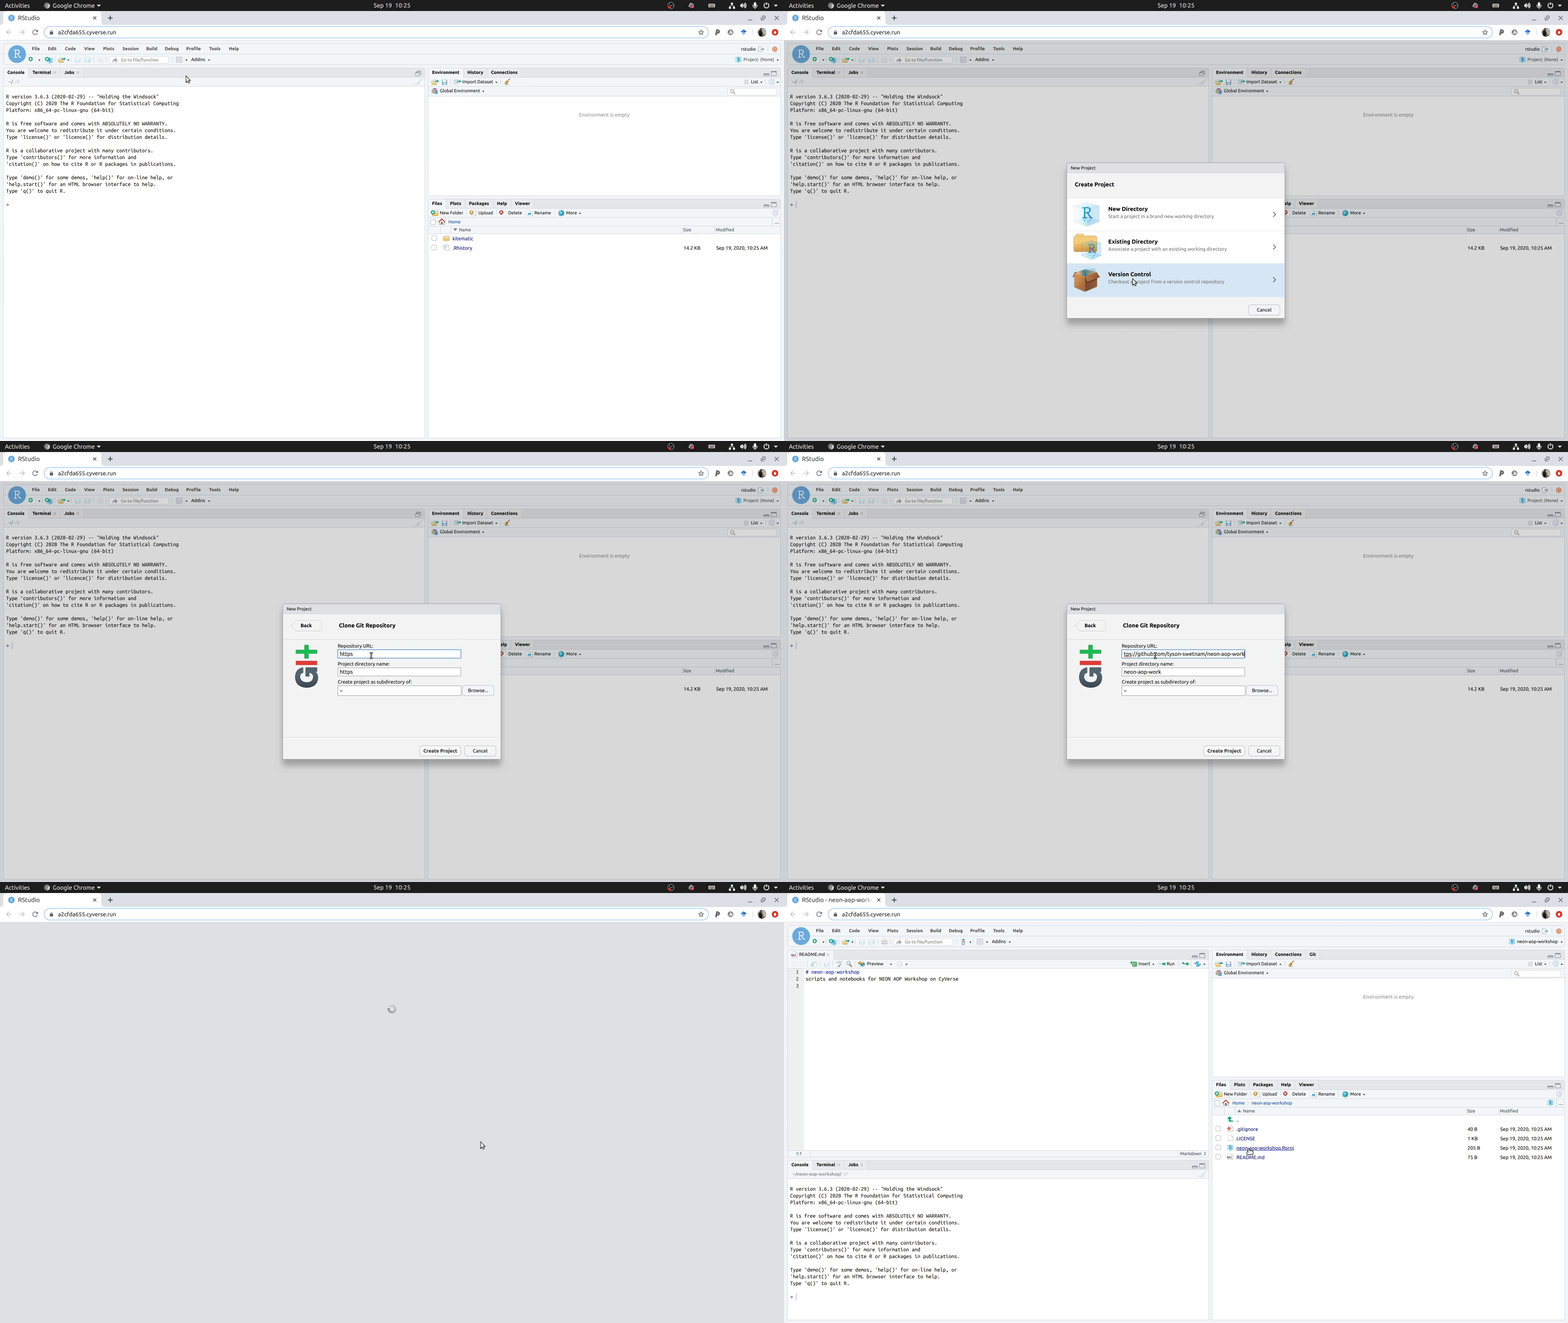
8. In RStudio, select ‘File’ then ‘New Project’ and then ‘Version Control’
9. The repository will be copied onto your instance and you’ll be in a directory with a new R project file.
This is a local copy of the
gitrepository from GitHub.Any changes thare are made locally on this machine will not affect the GitHub repository from which you got this.
10. Adding new files to the repository.
Now that there is a copy of the repo on your instance, you’re ready to start making changes and adding new scripts.
11. Updating a .gitignore file
gitis useful for tracking code – but it is not intended to track your data files.The best practice is to NOT keep your data in the same directory as the
gitrepository.However, you can add a
.gitignorefile and update it with the various types of files you wantgitto not track or to submit back to GitHub when you commit your changes.When you use R Studio to create a Version Control project, it will generate a
.gitignorefile for you. The default files that it will ignore are related to your local R Studio environment:.Rproj.user .Rhistory .RData .RuserdataYou can update the
.gitignorefile so that it will also NOT track data type files:.Rproj.user .Rhistory .RData .Ruserdata *.csv *.tif *.laz *.las *.hdf5 *.hd *.txtthis
.gitignorewill ignore all files with the*and given file extensions.An alternate way of making sure that you track your files is to include
!only certain file types:# ignores everything ... /* # ... but the following !*.R !*.Rmd !*.RprojIf you own the GitHub repository, you will be able to make changes “commits” to the repository and “push” them back to the GitHub.
If you pulled this repository from someone else, and you make commits and submit a “push” it back to the other person’s GitHub, it will ask you to enter some user identification.
This process creates something called a “pull request” on GitHub, where the owner of the repository can see who made the changes, and review whether or not they agree with these changes. They can then choose to approve the request, and the changes will update their repository.
Add your code to the Repository
12. Copy the contents of our other NEON exercises into the new directory.
These new files are not yet added to the
gitmodule tracking.
13. Configure git for the first time
Because we’re working on a remote instance, the
gitconfiguration has not been set.To configure
gitfor sending requests to GitHub, set the email address and a name for your remote:git config --global user.name "Your Name" git config --global user.email "Your@email.address"
14. Create a new “Branch”
The repository has a version called
masterCreate a new branch called
mainWe’ll do this in the RStudio Git menu, but it can also be done in the terminal:
git checkout -b main
15. Add tracking for the new files in the repository and create a “commit” message
RStudio’s Git integration should show you which files are not tracked by
git. You can select the check boxes for each file and add them.You need to create a “commit” message which briefly explains the changes you’re about to make.
16. Push your changes to the GitHub.
Your updates are now ready to be submitted to the GitHub from RStudio.
Because you’re sending these files from a remote computer, your changes will not automatically be accepted by the GitHub.
Review and Accept your own Pull Request
17. Review and Accept your own “Pull Request”
Go to your GitHub user profile and select the repository.
Your changes should now be registered as a “Pull Request”
You will see your “commit” message, and be able to review the new files and file changes.
18. Your files are now saved in GitHub, under a new branch called main
You can safely delete the
masterbranch in RStudio and on GitHub.On GitHub, above the list of files, click the
brancheshyperlink, select themasterbranch and delete it.Black Lives Matter
Github has stated that they will remove the use of the term
masteras the default branch name from their platform, but that is not yet the case.Website js script for changing
mastertomain
Description of output and results
You should now have a tracked version control of your workshop project, with all of the pre-existing scripts. You can re-use this repository on your local computer, or somewhere else in the future.
Hopefully, you now understand how GitHub can be used to share code and analyses, and to do your science!
NEON maintains a large library of pre-written scripts on their GitHub repository: https://github.com/neonscience
Fix or improve this documentation
Search for an answer: CyVerse Learning Center
Ask us for help: click
 on the lower right-hand side of the page
Report an issue or submit a change: Github Repo Link
Send feedback: learning@CyVerse.org


